How to Make Pumpkin Spice Sugar Scrub!

Mary Kearns will be demonstrating how to make your own sugar scrubs and fizzing bath salts on Great Day Washington, a new morning show on CBS’s Washington, DC affiliate station WUSA9. The show airs live Tuesday, October 20th from 9am – 10am EST, so tune in if you’re in the area! If you can’t, the video will be available on their website. And here is the recipe for pumpkin spice sugar scrub we will be demo’ing!

It contains organic sugar and pure sea salt for exfoliation, plus real pumpkin purée for a bit of skin brightening thanks to the natural alphahydroxy acids. For additional skin benefits, and to make it smell delicious, just add some pumpkin spice blend. Delicious!

Ingredients: ½ cup sugar, ½ cup salt, ¼ cup vegetable oil, 1 tablespoon pumpkin puree, ½ tsp pumpkin pie spices

Instructions: Combine all ingredients in a bowl until well-blended. Because it contains fresh pumpkin, use immediately, or store in a clean jar in the refrigerator until you are ready to use it. Enjoy!

IMG_2641

Lovely Chili Hot Chocolate with Rose Petals

photo-3

Love-Me-Dew at Shine Restaurant & Gathering Place, Boulder, CO


On a recent visit to Boulder, I had the pleasure of visiting one of my favorite restaurants, Shine Restaurant and Gathering Place. And one of my favorite things about Shine is their offering of “potions,” which are a “thoughtfully and lovingly concocted array of fantastic, non-alcoholic brews, using a rich assortment of herbs, vibrational-essences, juices, spices, coconut milk and natural sodas.”

This time around, I tried the Love-Me-Dew, which is coconut milk infused with cocoa, chili powder, rose petals, raspberry agave and vibrational essence of rose quartz. It is designed to enhance feelings of self-acceptance and self-love. It certainly evoked feelings of love for this drink – since I tasted it, I have been craving it! So, I thought I would try making my own version given ingredients I had around the house.

Here is my version:

  • 2 cups almond milk (best when you have time to make your own)
  • 1 tablespoon cocoa powder
  • 1 tablespoon maple syrup (more or less, depending on your taste)
  • 1/4 teaspoon ancho chili powder (Shine uses chimayo; you can use more or less, depending on how spicy you like it)
  • A few sprinkles of finely chopped dried organic rose petals for garnish (make sure you use culinary roses)

Heat the almond milk in a saucepan over medium heat until it just starts to steam. Lower the heat and add the cocoa powder, maple syrup and chili powder. Stir until well-blended and remove from heat. Divide into two ceramic mugs and sprinkle a half-teaspoon of rose petals on top of each. Share the love!


How to Make Fresh Hibiscus Tea

Hibiscus2

Hibiscus flowers make a wonderful tea. The bright red color and tart, cranberry-like flavor delight the sense. And research has shown there are health benefits to drinking hibiscus tea, including regulating cholesterol and blood pressure.

I recently made tea from the fresh hibiscus flowers growing in my garden. Here’s how to do it:

1) Using 4-5 flowers, remove the stamen from the center of each flower so that only the petals and green pistil beneath each flower remain.


Hibiscus5

2) Tear up the flower petals and place them in a heat-proof container.

3) Pour 3 cups of boiling water over the flowers.

4) Allow to steep for at least 20 minutes. It will be a brilliant deep magenta color.

Hibiscus7

5) I added 1/4 cup of honey, the juice of 1 lime and 1 tablespoon of grated fresh ginger. It changes the color of the concoction to a lighter pink. Delicious!

Hibiscus8


How To Make Delicious Herb-Infused Water

herbwater21In celebration of National Water Quality Month, created to help remind us of the importance of protecting our water supplies, I wanted to share some recipes for herb-infused waters that are as healthful as they are delicious.

For these recipes, I chose herbs that are growing in my garden, along with a complementary flavor – citrus gives the blends a nice zing, and vanilla beans add a light sweetness to the water. There are unlimited flavor combinations, and it is fun to experiment with a variety of herbs, spices and fruit. Here are a few suggestions to get you started:

Lavender and Vanilla
• 1/4 cup fresh lavender, buds crushed slightly to release the flavor
• 1/2 vanilla bean, sliced lengthwise

herbwater2

Mint and Lime
• The rind of 1 lime
• 1/2 cup fresh mint, coarsely chopped

HerbWater11

Shiso and Lemon
• 1/2 cup fresh shiso, coarsely chopped
• The rind of 1 lemon

herbwater3

herbwater5herbwater6HerbWater12

1. Place ingredients in a quart-sized canning jar and fill with cold, filtered water.
2. Allow the filled jar to sit, refrigerated, for 8-12 hours to allow the flavors to infuse.
3. Strain out the ingredients and return the water to the jar. Keep the jar in the fridge to keep it chilled. It will last 2-3 days.
4. When serving, add some fresh sprigs of herbs or slices of fruit to your glass for a beautiful presentation.

You can adjust the amounts of the ingredients for more intense or milder flavors. Have fun experimenting!

All Around the Parkberry Bush: Fresh Mulberry Cobbler

IMG_9351

Back in 2010, I wrote a post singing the praises of mulberries (abundant in the Mid-Atlantic this time of year), after discovering a perfect foraging spot in a nearby park. In the post, I included a recipe for mulberry pie, which is just one of many great ways to use these berries.

Since then, mulberry picking has become an annual tradition for us, and besides pies, I have made sauces and syrups. This year, I thought I would try some quick and easy, and decided on a simple cobbler.

IMG_9345

The berries were in various stages of ripeness, so we picked about 3 cups of deep red/purple mulberries, and may go back for another batch in a couple of weeks. We avoided the white unripe ones. Wildman Steve Brill warns that unripe berries, uncooked young leaves, and mature leaves are toxic and mildly hallucinogenic and cause terrible headaches and upset stomachs.

When foraging, it is also important to make sure that anything you eat hasn’t been sprayed with toxic chemicals. The park where we harvested these berries is in a pesticide-free buffer zone since it is within a 2-mile radius around a school.

IMG_9346To make the cobbler, I adapted Southern Forager‘s Totally Awesome Mulberry Cobbler recipe by using dairy substitutes, but you can use regular milk and butter instead of the almond milk and Earth Balance. I also added some vanilla extract and fresh lemon to give it some zest. Mulberries are tasty, but lack acidity, so the lemon adds a nice balance to the sweetness of the berries.

Ingredients:
1/3 cup Earth Balance vegetable spread
1 ½ cup all purpose flour
1/3 cup organic cane sugar
2 tablespoons maple syrup
1 cup almond milk
1 teaspoon vanilla extract
2 tsp baking powder
2 cups of mulberries (you can leave the stems on, as they will soften during cooking)
Juice and grated rind of 1/2 lemon
Directions:

Preheat your oven to 325°F. Put the Earth Balance in an 8″x8″ baking pan and place in the oven until the spread is melted. In a separate bowl combine the dry ingredients. Mix in almond milk, maple syrup and vanilla until smooth. Toss the berries with the lemon juice and grated peel, and spread over bottom of baking pan. Pour the batter into the baking pan over the berries. Bake 40-45 minutes or until golden brown. Enjoy!

IMG_9348Wildman Steve Brill offers a vegan mulberry crumble recipe, which calls for mint. I found this recipe after I had made my cobbler, but will keep it in mind for the next batch of mulberries we harvest.


How to Make Violet Facial Toner

violet9It’s spring here in the Mid-Altantic, and with it comes violets! In the past, I have posted recipes using these delicate purple flowers, including violet syrup and violet cordial. Besides being pretty, tasty and nutritious, violets also make a wonderful ingredient in natural skin care.

violet1

They are moisturizing, toning, antiseptic, and healing. And violets contain significant amounts of mucilage that help soothe the skin, reduce inflammation, redness, and sooth irritated tissue. Violet flowers and leaves are excellent for dry, sensitive skin. Following is a recipe for violet facial toner, which you can make with either Apple Cider Vinegar or Witch Hazel.

Apple Cider Vinegar makes a great facial wash and toner, since it is great at removing excess oils and helps balance the pH levels. It has antibacterial, antiviral and antifungal properties and also contains alpha hydroxy acids, which help remove dead skin cells, resulting in a healthier-looking complexion.

Witch Hazel has astringent, antiseptic, anti-inflammatory and antibacterial properties and makes a great facial toner, even by itself, for all skin types. Be sure to use a true Witch Hazel extract, which contains mostly Witch Hazel and less than 20% alcohol.

Ingredients:

  • 2 cups (1 quart) distilled water
  • 1 cup violet flowers and leaves
  • 1 cup organic apple cider vinegar or organic witch hazel
  • Lavender essential oil (optional)

violet2Boil the water. Then make an infusion by pouring the water over the violet flowers and leaves in a glass or ceramic container. Cover and let stand for 1 hour (the closed jar keeps the water-soluble vitamins from escaping in the steam).  Strain out the flowers and you will have a beautiful purplish-blue liquid.

violet6

Combine the violet infusion with the vinegar or witch hazel. Pour into sterilized bottles and store in a cool, dry place. The vinegar and witch hazel act as natural preservatives, so this mixture will last quite a while.

violet8

Use this cleansing, pH-balancing, restoring toner after washing your face.  Apply with clean sterile cotton balls or pour a small amount in your hand and splash on, avoiding your eyes.

Both versions have mild, pleasant scents, but if you’d like something a little more flowery, you can add a few drops of lavender essential oil.

How to Make An Herbal Vinegar Hair Rinse

IMG_8811

One of my most popular offerings is my natural shampoo bars. My customers love them because they are gentle, effective and don’t strip the oils from their hair, so no conditioner is required. But, depending on the hardness of their water, some of my customers find it helpful to do a vinegar rinse once per month to keep their hair its shiniest.

No matter what type of shampoo you use, vinegar rinses are helpful in restoring your hair’s pH balance. They are also great for oily hair, itchy scalp, dandruff, dull hair, and other scalp conditions. You can easily make your own vinegar rinse, and the addition of dried herbs allows you to customize it to the needs of your particular hair.

IMG_8808

To make your own herbal vinegar rinse, mix 4 tablespoons of dried organic herbs with 8 ounces of organic apple cider vinegar.

For light hair, you can use a blend of 2 tablespoons organic rose petals and 2 tablespoons dried organic chamomile.

IMG_8809

For dark hair, you can use a mixture of 2 tablespoons dried organic nettle and 2 tablespoons dried organic lavender.

IMG_8807
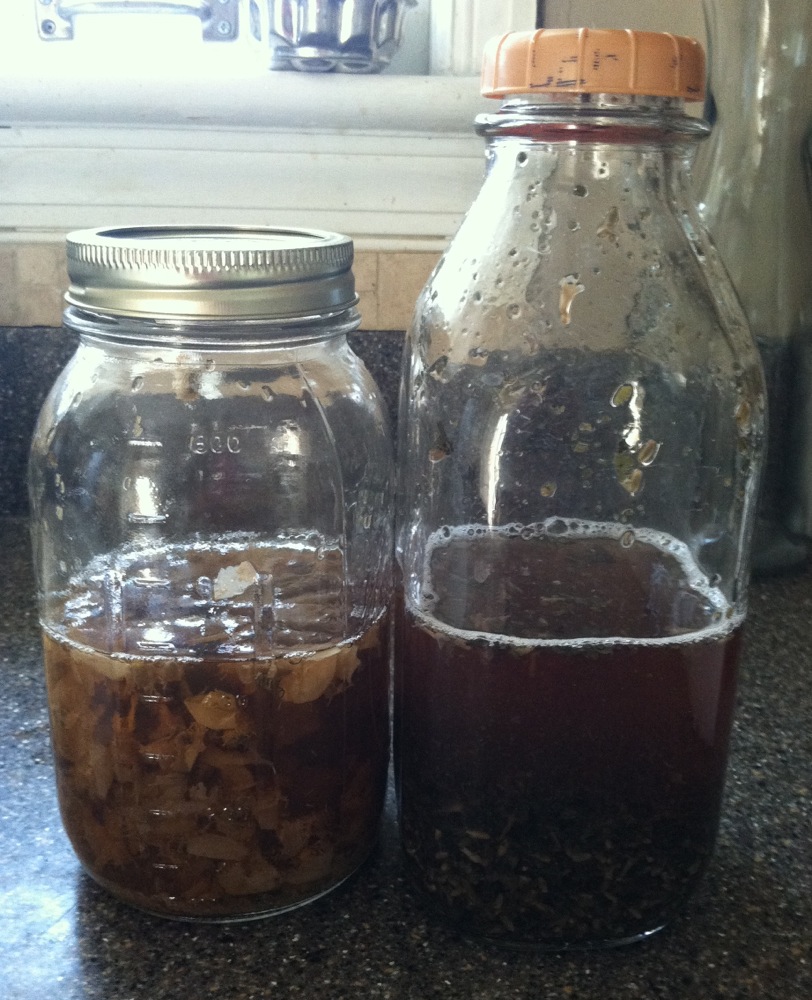
Place your herbs and vinegar in a clean glass jar, cap tightly. Label the jar with your herbs and the date. Allow to infuse for 6 weeks in a cool dark place, shaking the jar daily.

IMG_8814vinegar7

After 6 weeks, strain out the herbs and pour your herbal vinegar into a sterilized glass jar with a plastic cap (vinegar can erode metal over time). The infused vinegar will keep for at least a year if stored properly in a cool and dry place.

vinegar8 vinegar9To use, mix 1-4 tablespoons of your herbal vinegar with 1 cup of water. Pour this mixture over clean hair, working into scalp. Allow to sit for 2 minutes, then rinse with clean water. Or, you can leave it in and allow hair to dry. Enjoy your happy, shiny hair!

This can also be used as a facial toner. Simply apply to clean skin with a cotton ball or cotton cosmetic pad. Because this formula is alcohol-free and non-drying, you don’t need to rinse it off.


How to Make Rebatched Soap

IMG_8691

The following post is by Herban Lifestyle Outreach and Operations Coordinator, Lisa Seyfried. 

Here in the Herban Lifestyle Workroom, we have lots of bags of soap ends and pieces sitting around, waiting for us to do some wonderful with them.  I did some research on how to rebatch our soap – ‘rebatch’ means to basically melt down the soap and re-mold it as something new – and found a ton of information.  Site after site told me different ways to rebatch, each site claiming their method was the best.

In the end, I picked two recipes that were fairly close, combined them into my own method, and got to work experimenting.

First Batch of Rebatch Soap - Herban LifestyleMy first batch turned out great! It melted down really well, it molded really well, and it looks really pretty.

Second Batch of Rebatch Soap - Herban LifestyleMy second batch didn’t turn out quite so well.  It’s a little lumpier, a little cracked, and just not as pretty looking. I am chalking this up to attempting to double the recipe and the soap not liking that.

I do think that this recipe will  turn out well again if I keep it in small quantities.  The first batch was enough for three heart soaps, and the second batch made enough for five heart soaps.

To make rebatched soap:

You will need a glass measuring cup, or other microwave safe bowl, grater, your soap, 1/4 cup of water. Ingredients for Rebatched Soap - Herban Lifestyle

1. Grate 4 cups of soap in a glass or microwave safe container.  The smaller pieces the soap is in, the better it will melt.  Grated Soap - Herban Lifestyle

2. Add ¼ cup of water to the grated soap.  Don’t stir it in yet.

3. Microwave for 2 min and stir.  Repeat this process until the soap becomes slightly translucent and takes on the consistency of mashed potatoes.Melted Rebatch Soap - Herban Lifestyle

4. Glob into mold with a spoon.  Fill to the top, then bang the mold on the counter to get all the air bubbles out.  Then squish the soap down with your fingers (you might want to wear gloves for this) to make sure the soap gets into all corners of the mold.Molded Rebatched Soap - Herban Lifestyle

5. Cover the mold with a towel or cloth and let sit for 24 hours.

6. Unmold after 24 hours, let sit out for one week to cure.  One week is probably more time than the soap needs to cure, but just to be safe, I’d go with one week.

This is the rebatch method that worked best for me.  I have a feeling that everyone has their own method that works for them, with whatever kind of soap they are rebatching.  I’d really like to try adding some essential oils or some pigments in my next batch! Have you rebatched any soap? What method did you use?

How to Make All-Natural Insect Repellant

IMG_7065

Summer is in full-swing and the bugs are out in full force! Some of my readers have requested a recipe for an all-natural insect repellant, so I developed formula made with essential oils that works well and smells good, too!

Different essential oils repel different insects, so I used a blend of different oils to cover a wide spectrum of pests. For my recipe, I used cedar, citronella, clove, lavender, peppermint and rosemary with castor oil (which repels mosquitoes) in a witch hazel base.

Ingredients:

  • 3 ounces distilled water
  • 3 ounces witch hazel
  • 3.5 teaspoons of essential oils
  • 1 teaspoon glycerine (optional)

Combine well and pour into clean spray bottles.

IMG_7051

Shake well before each use as the water and oils will separate. Spray onto your skin or clothing, avoiding your eye area, covering as much area as possible. Wash with soap and warm water to remove once you are back indoors. Store in a cool, dark place.

IMG_7052

You can vary the recipe by using different essential oils, as long you keep the ratio of no more than 1 part essential oils to 10-20 parts carrier. Here are some of the best essential oils for repelling insects, along with the insects they repel:

  • cedar oil (fleas)
  • cinnamon oil (mosquitoes)
  • citronella oil (mosquitoes and biting flies)
  • clove oil (mosquitoes)
  • eucalyptus oil (mosquitoes, ticks, and lice)
  • geranium oil (ticks and lice)
  • lavender oil (ticks)
  • lemongrass oil (ticks)
  • orange oil (fleas)
  • peppermint oil (fleas)
  • rosemary oil (mosquitoes)

You can use any combination of the above listed essential oils. And instead of witch hazel and water, you can use olive oil, vodka or straight witch hazel without water.

NOTE: If you are pregnant or nursing, do not apply an insect repellent, natural or otherwise, without consulting your physician

IMG_6725This little nymph recently hitched a ride home on my leg from a hike in the woods. If only I had some of my homemade bug repellant with me, he wouldn’t have had a chance!

NOTE: If you are looking for all-natural pesticide recipes, this post on housekeeping.org has a comprehensive collection, including our neem-based recipe.

Minted Lemonade: Recipe for a Perfect Summer Drink

mintlemonade

In my opinion, two of the quintessential flavors of summer are lemon and mint. And when combined, they create a harmonious flavor combination that is bright and sunny. One of my favorite summer recipes is homemade lemonade, a tasty tonic. Lemons provide us with healthful amounts of Vitamin C and potassium. And mint is, among many other things, uplifting, breath-freshening and soothing for the digestive system.

Homemade minted lemonade is simple to make, requiring just 4 ingredients! Here’s my recipe:

Ingredients

  • 1 cup filtered water
  • 1 cup organic evaporated cane sugar
  • 2 cups freshly squeezed, strained lemon juice
  • 1 cup fresh mint leaves
  • 4 cups of filtered water

IMG_6740

Combine the sugar and 1 cup of water in a heavy-bottomed sauce pan and bring to a boil, stirring until the sugar is dissolved and the liquid is clear. Set aside to cool.

Peppermint (Mentha piperita)

Place the lemon juice in a large pitcher with the mint leaves (you can crush some of the leaves to release a bit more mint flavor).

IMG_6737

Add the remaining water to the lemon and mint, then sweeten to taste with the simple syrup. Refrigerate for at least one hour to allow the flavors to blend.

Enjoy!